Thursday, June 24, 2021

Preserving fresh chicken eggs


 I have been doing some research on how to preserve some of my farm fresh eggs when I have an abundance during the summer. One of the ways I discovered was keeping the eggs in a lime (calcium hydroxide) solution. I read some great things about this being a great way to preserve the eggs. The solution is made by mixing water and lime. Not the fruit kind, but the lime that can be found in the canning section of a store. I purchased a bag of the pickling lime to make the solution. I also purchased a couple of gallon sized containers with lids to place the eggs and solution in. I was able to get about 3 dozen eggs per gallon container. I then made the solution with a ratio of 1 quart of water with 1 ounce of lime and whisked it until it was all dissolved. I then poured the lime and water solution over the eggs until they were all submerged. Because the solution is calcium hydroxide, the calcium in the solution helps to seal the pores in the egg shells to diminish the air exchange that happens. This is the reason you want the solution to be over-saturated with the lime. When your solution is over-saturated, there will be some of the lime that settles to the bottom after it sits for a while. This is just fine to have and there is no need to re-stir the solution. I now have the containers being stored in a cool place in our basement. This method should keep the eggs for up to 2 years. I don’t foresee myself keeping eggs that long, I would just like to enjoy the eggs during the winter when the egg production is down. Fingers crossed that this works! 


Enjoy! 

Tuesday, December 12, 2017

When Satan wins...

We've all had those mornings... trying to get breakfast made for the family, get yourself ready, kids ready, etc. and still get out the door in time for church. And more often than not, getting out the door "on time" means you're walking in to the church building as the service is getting started. We had yet another one of those mornings today. It seems that no matter how early I get up, its always a struggle to get out the door. We seem to get out the door for work on time, sure, things can get pretty busy as you rush out the door, but we still make it out the door on time. Why can't this be the case for church? I often wonder why; why can't we, just once, leave on time. Most Sunday mornings it's a scramble and I typically do my makeup on the way to church as my husband drives. Some mornings I don't even make breakfast so we call in an order for a breakfast pizza and pick it up and eat it on the way. That is what a typical Sunday morning looks like in our household. But why is this? Am I not organized enough? Am I too slow at getting everyone ready? Aside from the toddler meltdowns and the baby spitting up all over my outfit and hers, I think there is a deeper reason as to why Sunday mornings are such a struggle. I believe that satan will use the toddler meltdowns and whatever else he can think of to run my patience down and speed the clock up until I throw my hands up and say "forget it!" Most mornings I just power through it and pray that we can get out the door soon. Today, I let satan win. And yes, I meant to say that I LET him win because it was a choice that I made. It was a choice that was made out of frustration. I can only imagine the message that God had for our family that day must have been a good one since satan worked extra hard that morning to keep us home. My heart broke as my toddler began to cry that she wanted to go to Sunday school. I was in tears as I felt like a failure and that I was letting my family down and setting an example I did not want to set for my toddler. Thankfully, God is gracious in my shortcomings. In 2 Corinthians 12:9, the apostle Paul writes, "But He [Jesus] said to me, 'My grace is sufficient for you, my power is made perfect in weakness.' Therefore I will boast all the more gladly of my weaknesses, so that the power of Christ may rest upon me." God knows us, He knows me, and God does not expect us to be perfect. He knows we will fall short, no matter how hard we try. God is the missing piece to make us perfect. I am far from perfect, but with God's grace and power, I am complete. God's power is made perfect in my weakness, and I have a lot of weaknesses! Paul goes on to write in verse 10, "For the sake of Christ, then, I am content with weaknesses, insults, hardships, persecutions, and calamities. For when I am weak, then I am strong." The word that stands out to me is 'content'. I sometimes struggle with being content. I need to learn to be content in my weaknesses, and be content with the hardships of Sunday mornings. Being content and resting in God's perfect power.

Thursday, June 15, 2017

Encouragement for a real mom

I saw a post on Facebook the other day that I read through and enjoyed. It is very encouraging to a mom when it seems as if you aren't making a difference and questioning yourself. I see moms out there that seem to have it together and appear to be a "super mom" with everything in order and are the perfect mother, wife and homemaker. They can seem intimidating when I have days that I feel like I struggle to keep my house clean, know what I am going to make for supper more than 2 minutes before it should be on the table, having all the laundry folded and put away and not just sitting in the basket for a week, and so much more. As a real mom that balances full time work outside the home, housework and even homework (yes, I am back in college, what was I thinking?!?) I know the struggles. So here is the article I found encouragement in and I hope all you other real moms out there will look at this often when you are feeling discouraged and feel that you just aren't enough. Enjoy!

"To the mom hiding in her bathroom, needing peace for just one minute, as the tears roll down her cheeks..

To the mom who is so tired she feel likes she can't function anymore and would do anything to lay down and get the rest she needs...

To the mom sitting in her car, alone, stuffing food in her face because she doesn’t want anyone else to see or know she eats that stuff…

To the mom crying on the couch after she yelled at her kids for something little and is now feeling guilty and like she is unworthy…

To the mom that is trying desperately to put those old jeans on because all she really wants is to look in the mirror and feel good about herself…

To the mom that doesn’t want to leave the house because life is just too much to handle right now…

To the mom that is calling out for pizza again because dinner just didn’t happen the way she wanted it to…

To the mom that feels alone, whether in a room by herself or standing in a crowd...

You are enough.
You are important.
You are worthy.

This is a phase of life for us. This is a really really hard, challenging, crazy phase of life.

In the end it will all be worth it. But for now it’s hard. And it's hard for so many of us in many different ways. We don't always talk about it, but it's hard and it's not just you.

You are enough.
You are doing your best.
Those little eyes that look up at you - they think you are perfect. They think you are more than enough.

Those little hands that reach out to hold you - they think you are the strongest. They think you can conquer the world.

Those little mouths eating the food you gave them - they think that you are the best because their bellies are full.

Those little hearts that reach out to touch yours - they don’t want anything more. They just want you.

Because you are enough. You are more than enough, mama.
You. Are. Amazing."

Credit: Latched and Attached

Painting a Herringbone Design

We recently moved our toddler into a "big girl" room and I decided to do an accent wall with a herringbone design. My husband was very skeptical and said it was going to be "too busy." I assured him I was going to do it in a larger scale so it wouldn't be so busy. The herringbone design can be busy, so be sure to use a bigger scale when doing this. I made my design 9"x18". After priming the walls to get a dark purple off the wall, I then painted the accent wall white. I wanted the lines to be white and the "boxes" to be a light pink. I first started by finding the center of the wall and the very bottom along the base board. From there, I drew lines at a 45* angle that were 9" apart. I planned to have my design be 9"x18" boxes. It took me only 2 days to do this project by myself while I was 9 months pregnant and with a toddler "helping" me. It's fairly simple. The biggest part of the project was getting the 9" grid lines on the wall. That took me a better portion of a day to do. It is difficult to see in this picture, but you can faintly make out the 9"x9" grid I drew on the wall with pencil.


After that, I took Frog tape in 27 1/2" lengths and put them on the wall to create the design. This took a little time to make sure I was getting the pattern correct. I added 1/2" of tape to make sure there was a little overlap in the tape.


Once the tape was finally up, I then painted. This part did not take very long since it was only 1 wall. I put 2 coats on the wall. After the paint had time to dry slightly, I began to pull the tape off the wall. It looked great! It was a fun project with a beautiful result!


Any further questions on how this was done, please email me at thehomesteadedmom@gmail.com

Enjoy!

Raised Bed Garden

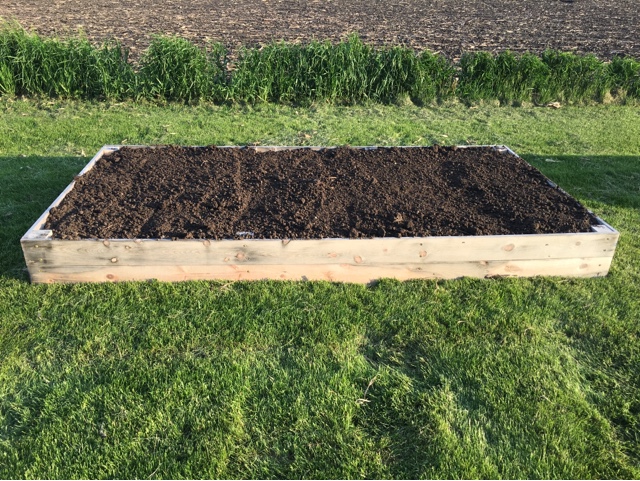
This is my second attempt at having a garden. A couple of years ago I planted one in our yard, and 3 days after planting all the seeds, we had a torrential rainfall and my garden had standing water in it. I only got about 6 sugar snap peas off of 1 plant that survived. I decided to try a raised bed this time to hopefully help when we get strong rainfalls. It's nothing special, just simply a few 2x6's and 2x4's that I was able to convince my husband to build for me. We then got a trailer full of dirt to fill it.


I decided to buy tomato plants and pepper plants since I had our second child in March and was a little too busy to start seeds inside. I also bought a cilantro plant as well. I planted from seeds cucumbers, sugar snap peas, okra and green onions.


After just a few weeks, things are coming in nicely. My cucumbers, sugar snap peas, okra and green onions have all sprouted and are doing well. I actually had to thin out my sugar snap peas a bit. A couple of my tomato plants have begun to flower. My cilantro is also flowering. We are making progress! No produce yet, but its coming!


Any questions, feel free to email me at my email address: thehomesteadedmom@gmail.com

Enjoy!

Monday, March 13, 2017

DIY Toddler Bibs

My daughter outgrew the bibs that we bought for her when she was younger. They just weren't big enough to cover her and keep her clean when eating anymore. I went to the store to get larger bibs and realized at $8 a bib, I did not want to pay that much. Especially since you can't just have 1 or 2 bibs, unless you want to do laundry every night to wash them for the next day. As I was looking at the bibs I discovered it was basically a hand towel with a hole cut in it to slide over their head. I didn't like the idea of sliding it over her head, especially if the bib gets really dirty during that meal. I decided to buy 2 hand towels which were $2 a piece. They were big enough that I was able to cut them in half and still make a bib that was slightly bigger than the $8 ones. I cut the towels in half, then folded the cut edge over twice and did a straight stitch to close the edge. I then did a zig-zag stitch over the hole I cut for the neck.


 I wasn't 100% sure this would seal the edge enough to keep it from fraying after multiple washes, but after using these for several months now, they are still holding up! I then took a small square of velcro and sewed that to the back so it would secure behind the neck. 


These bibs work great and definitly keep her clean when she eats. At $1 each, I plan to make more! It was a quick, 30min project while she napped one day. I hope you enjoy!

Tuesday, June 21, 2016

Chicken Waterer

We came up with a very simple way of creating an automatic chicken waterer using a 5gal bucket, hose, PVC pipe and chicken nipples. We decided to do this to help keep the water clean and keep it off the ground. We were also looking for a water system that would allow us to go a few days without bringing gallons of water out to the chickens. We have been using this system for a while now and it has been working great!! We can fill that 5gal bucket and that can last the chickens approximately 2 weeks!

We first took the 5gal bucket and drilled a hole toward the bottom on the side of the bucket. We then secured brass fittings for a hose in the bucket and sealed it with some silicone sealant. We allowed that to set up over night. 


In the meantime, we drilled small holes in the PVC and secured the chicken nipples in the PVC. We attached a 6' garden hose to the PVC pipe using a PVC fitting that fit our 2" PVC pipe and had a male end. We used some plumbers tape to help secure the metal hose with the PVC fitting. 


We then cut a hole in a piece of 2x4 to suspend the watering tube from the coop. 


It took a couple hours before our chickens figured out how to use the nipples, but once one of them did, they all then used it. It's a great way to save on water and the water stays clean verses having a container on the ground. 

Enjoy!